
GA4 is the new Google Analytics platform that is replacing the current Universal Analytics.
It offers a number of enhanced benefits of Universal Analytics and if you haven’t already set it up then you need to before 30 June 2022 if you wish to have year on year data once Universal Analytics time ends on 1 July 2023.
There are a number of guides on how to set GA4 up, so we wanted to keep this as short and sweet as possible. From configuring your GA4 account in Google Tag Manager to setting up events, setting up Google Analytics 4 can be done in as little as 15 minutes.
Check out our quick and easy guide below.
1. Set up GA4 Configuration in Tag Manager
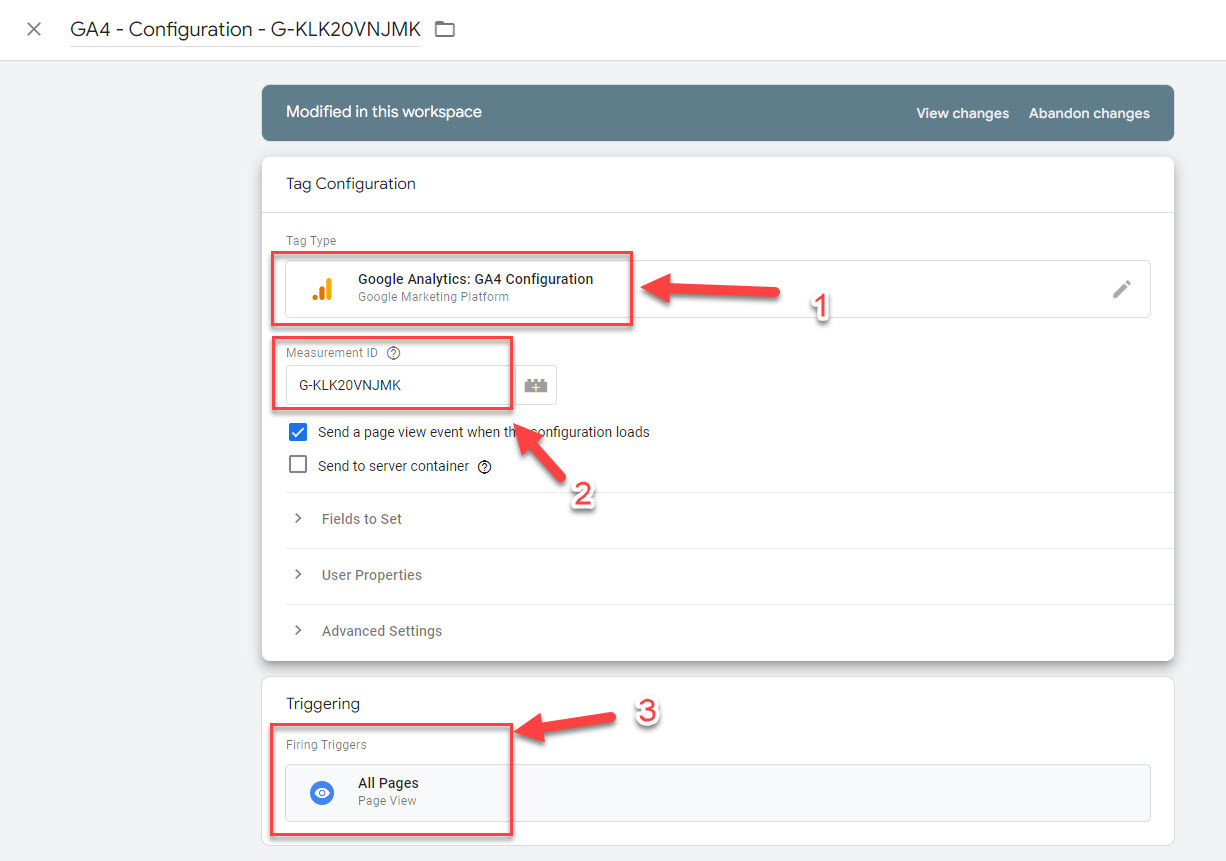
To start tracking sessions, you need to set up the GA4 Configuration tag in Google Tag Manager.
Click ‘tag’ and ‘new’ in the top right hand corner.
Then input the following details:
Tag Type: Select ‘Google Analytics GA4 Configuration’
Measurement ID: G-GXXXXXXXXX (Your unique GA4 Measurement ID).
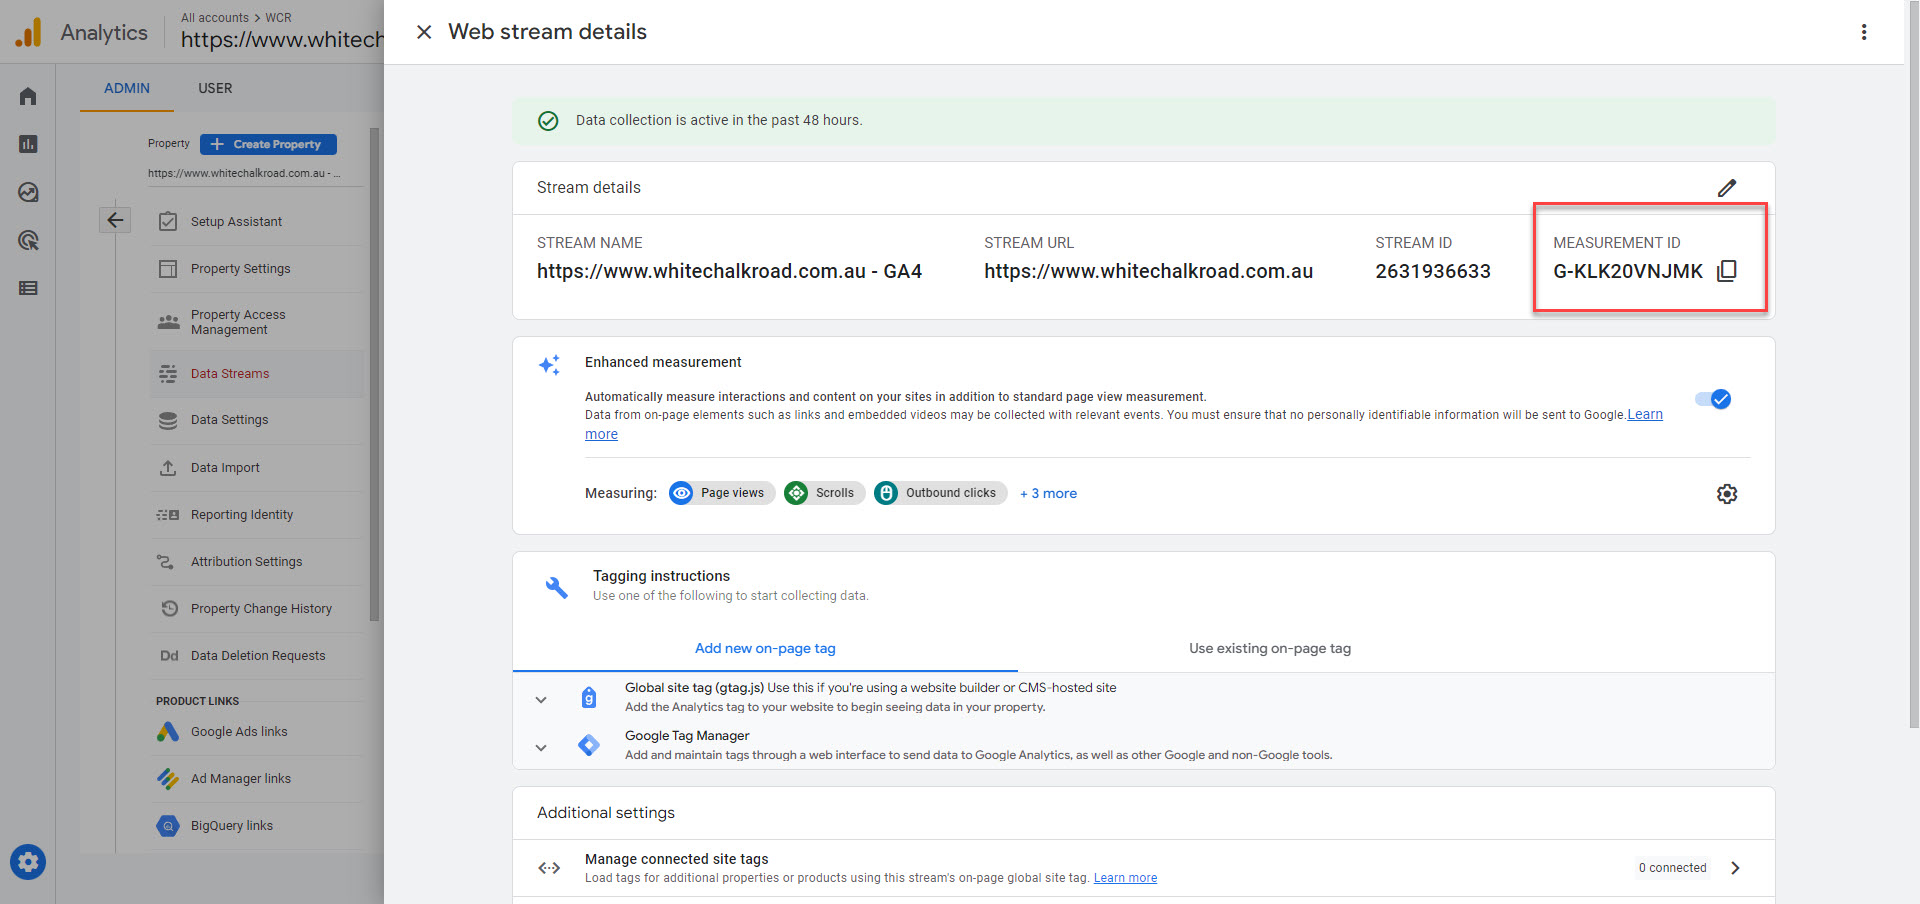
Note: This can be found in your GA4 account under ‘Admin’ → Property ‘Data Streams’ → Select your data stream (labelled with your website) → ‘Web Stream Details’ and copy your measurement ID (see image 2 & 3 for more details)
Triggering: All Pages, Page View
Image 1: Set up GA4 configuration in Google Tag Manager
Skip image 2 and 3 if you have already found your GA4 measurement ID.
Image 2: Find your GA4 measurement ID in GA4
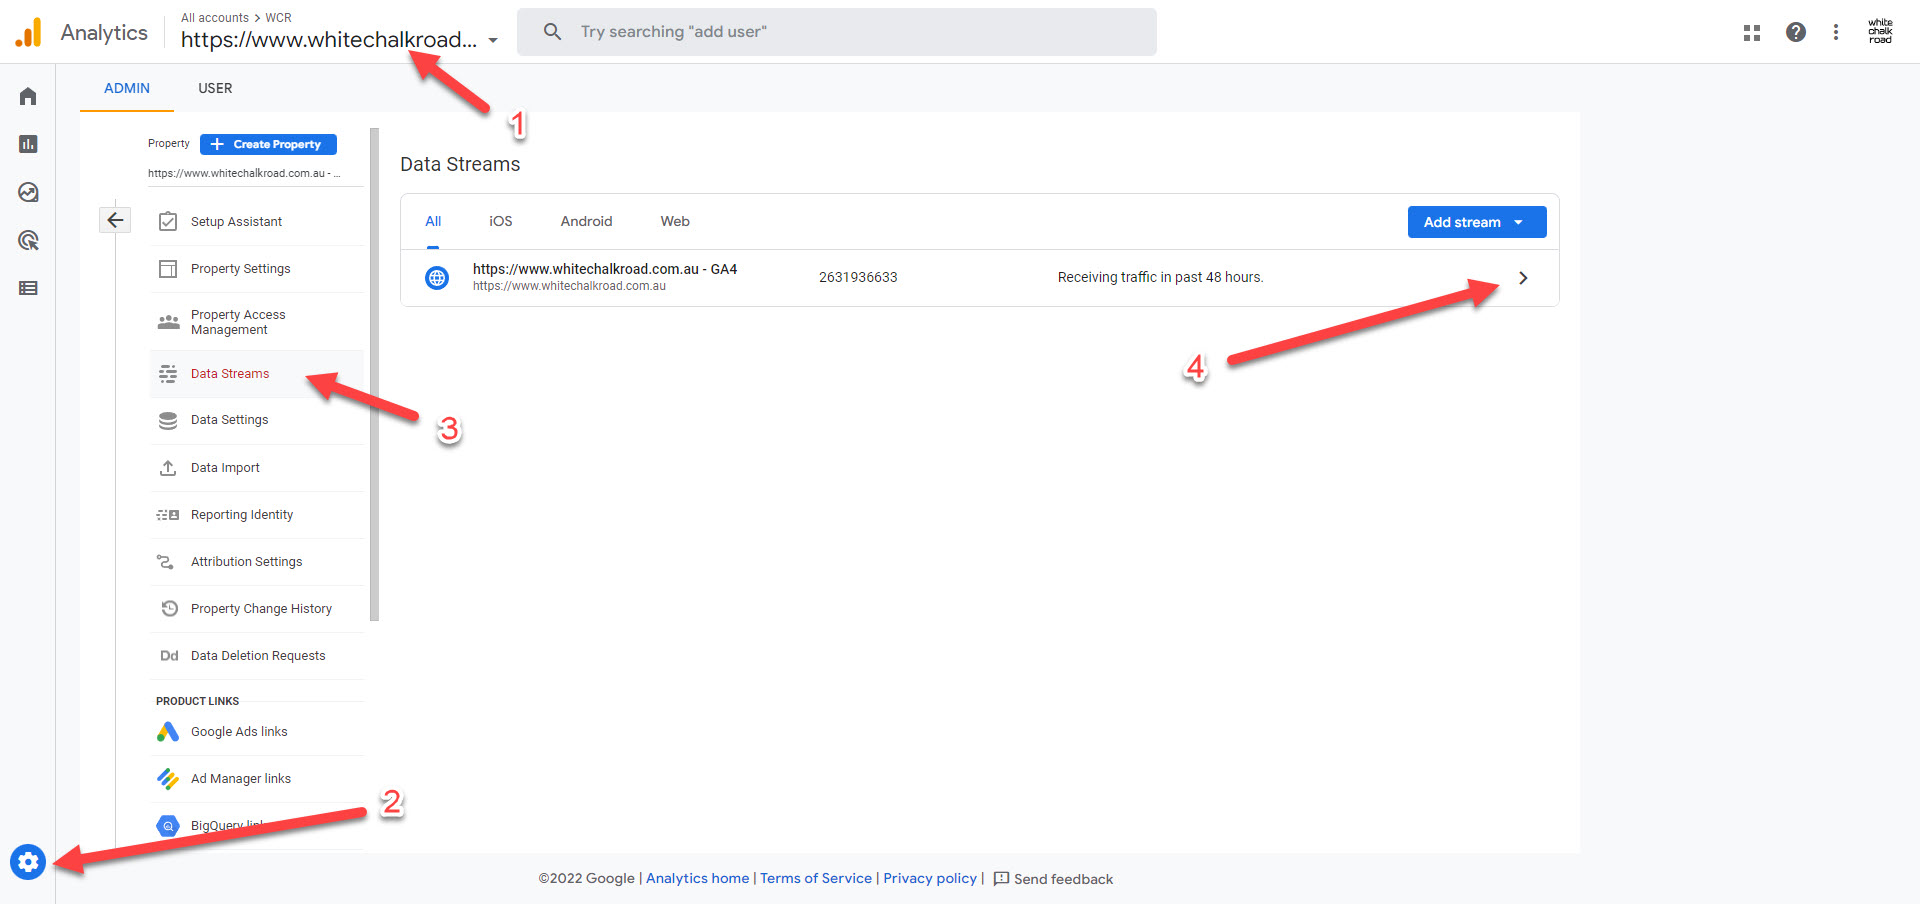
Image 3: Copy measurement ID
2. Set up phone and email clicks in Google Tag Manager
First you will have to create triggers for ‘Emails Clicks’ and ‘Phone Clicks’ in Tag Manager. If you already had these triggers set up in Google Tag Manager for Universal Analytics then disregard step 2.1 and move onto set 2.2.
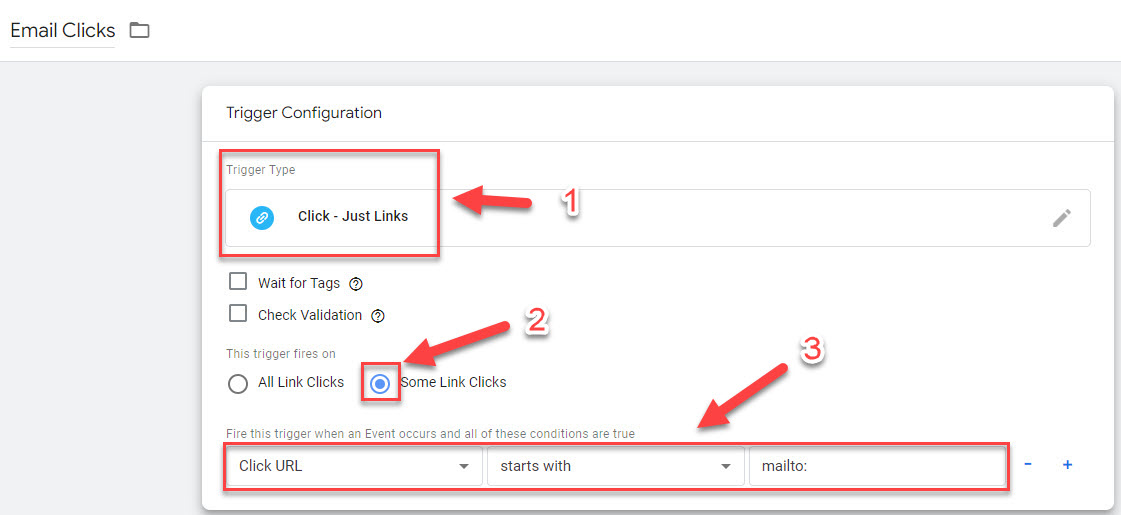
2.1 Set up ‘Email Clicks’ trigger in Google Tag Manager:
Click ‘triggers’ and ‘new’ in the top right corner
- Trigger Type: Under Click select ‘Just Links’
- This trigger fires on: ‘Some Link Clicks’
- Fire this trigger when an Event occurs and all of these conditions are true: Select ‘Click URL’ → ‘starts with’ → mailto:
- Click ‘save’
Image 4: Set up ‘Email Clicks’ trigger in Google Tag Manager
To set up a ‘Phone Clicks’ trigger in Google Tag Manager, repeat this process but replace ‘mailto:’ with ‘tel:’
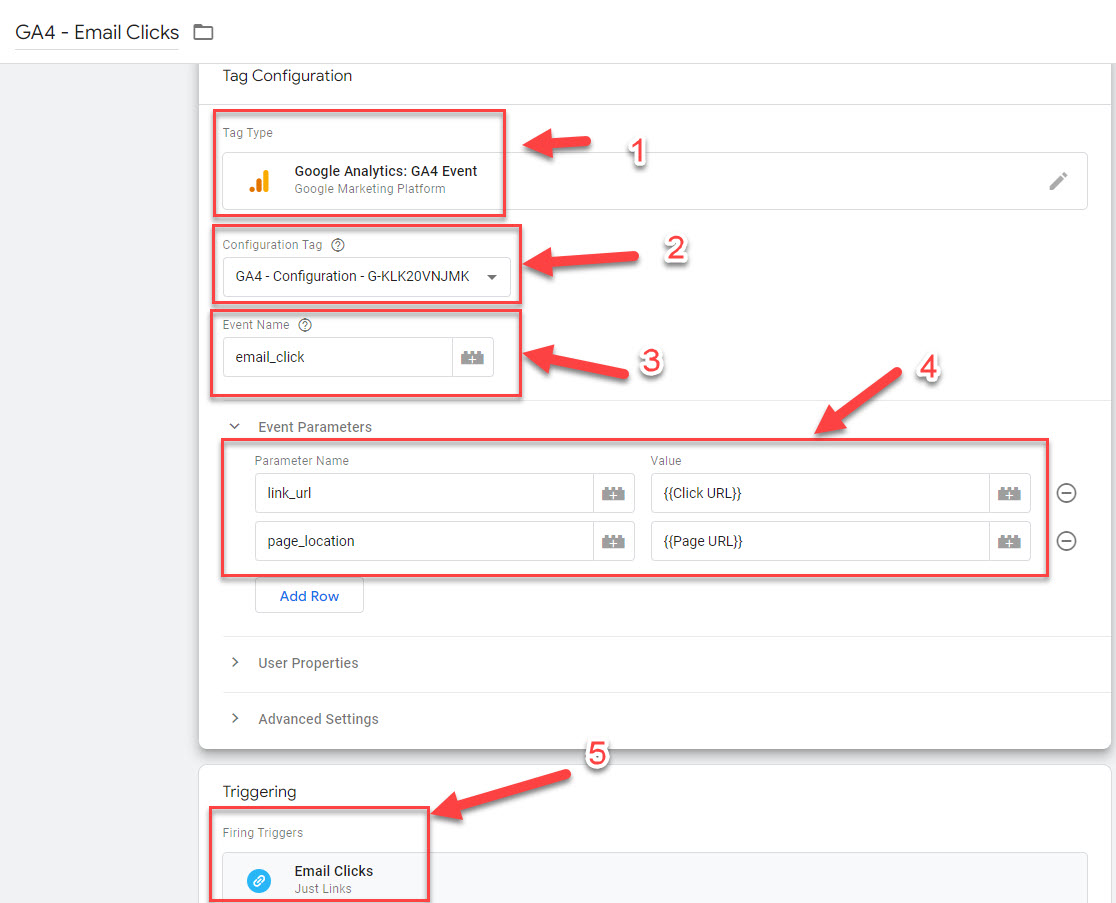
2.2 Set up ‘GA4 – Email Clicks’ tag in Google Tag Manager:
Next create a new tag and name it E.g ‘GA4 – Email Clicks’
- Tag Type: Google Analytics: GA4 Event
- Configuration Tag: Select your configuration tag that was set up in step 1.
- Event Name: email_click
- Event Parameters
Parameter Name: link_url Value: {{Click URL}}
Parameter Name: page_location Value: {{Page URL}} - Trigger: Select the ‘Email Clicks’ trigger
Click ‘Save’
Tip: Make sure you input the parameter names exactly how they appear above (including all lowercase) and “_”.
Image 5: Set up ‘GA4 – Email Clicks’ tag in Google Tag Manager
2.3 GA4 – ‘Phone Clicks’ tag in Google Tag Manager:
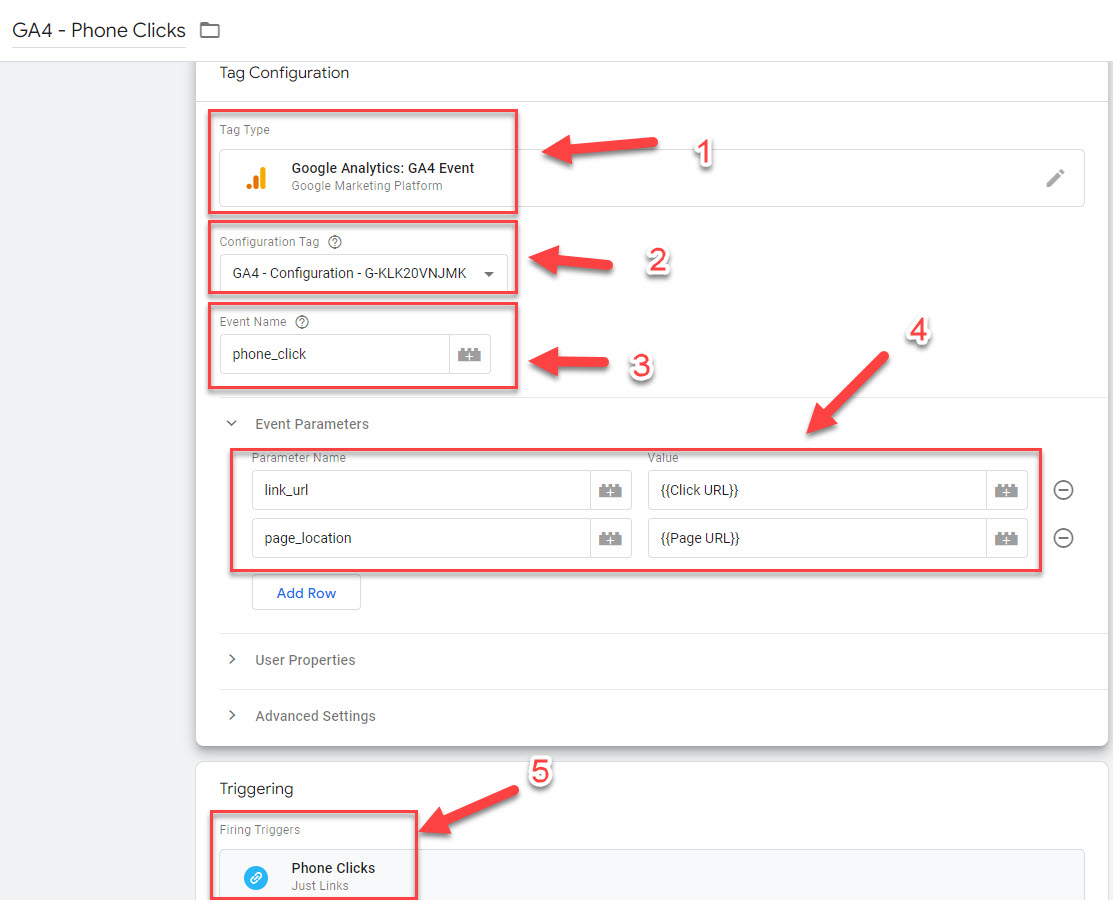
Repeat the same steps for “Phone Clicks”. All that needs to change is the following:
Tag name: ‘GA4 – Phone Clicks’
Event Name: phone_click
Trigger: Select the ‘Phone Clicks’ trigger
So, it will look like this:
- Create a new tag and name it E.g ‘GA4 – Phone Clicks’
- Tag Type: Google Analytics: GA4 Event
- Configuration Tag: Select your configuration tag that was set up in step 1.
- Event Name: phone_click
- Event Parameters
Parameter Name: link_url Value: {{Click URL}}
Parameter Name: page_location Value: {{Page URL}} - Trigger: Select the ‘Phone Clicks’ trigger
Click ‘Save’ & ‘Submit’ your workspace changes.
Image 6: GA4 – ‘Phone Clicks’ tag in Google Tag Manager
3. Set up conversions in GA4
Now, we want to set up conversions (also known as ‘Goals’ in Universal Analytics). The way these are set up in GA4 is a little different to Universal Analytics. You can either mark existing ‘Events’ as ‘Conversions’ or create custom conversions.
3.1 Mark existing ‘Events’ as ‘Conversions’
- Make sure you are logged into your GA4 account
- Click ‘Configure’
- Click ‘Events’
- Find the custom parameters you previously set up using Google Tag Manager (email_click and phone_click)
- Toggle to ‘Mark as conversion’
Image 7: Mark existing ‘Events’ as ‘Conversions’
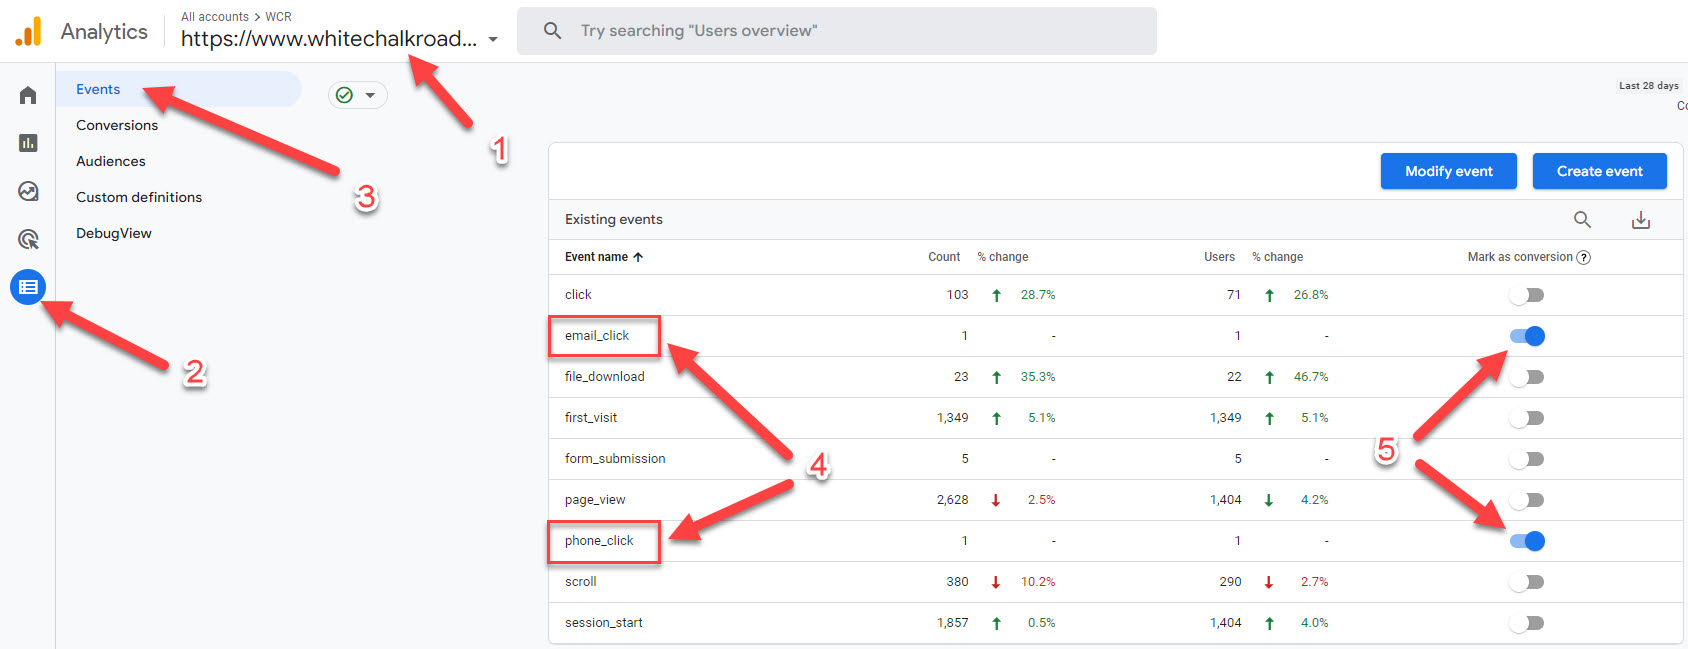
Both phone_click and email_click will now appear and be tracked as ‘Conversions’.
Important note: The custom parameters we created will start appearing in your GA4 reports within 24 hours.
3.2 Create custom conversions
To create custom conversions such as Form Submissions you will need to create a ‘Customised Event’.
- Click ‘Configure’
- Click ‘Events’
- Click ‘Create event’ (Image 7)
- Click ‘Create’
Configuration details: - Custom event name: form_submission (Image 8)
- Matching conditions
Parameter: event_name Operator: equals Value: page_view
Parameter: page_location Operator: contains Value: /thank-you/ - Click ‘Save’
- Once this starts tracking as an ‘Event’ you will be able to toggle the ‘Mark as conversion’
Image 7: Customised event

Image 8: Create customised event
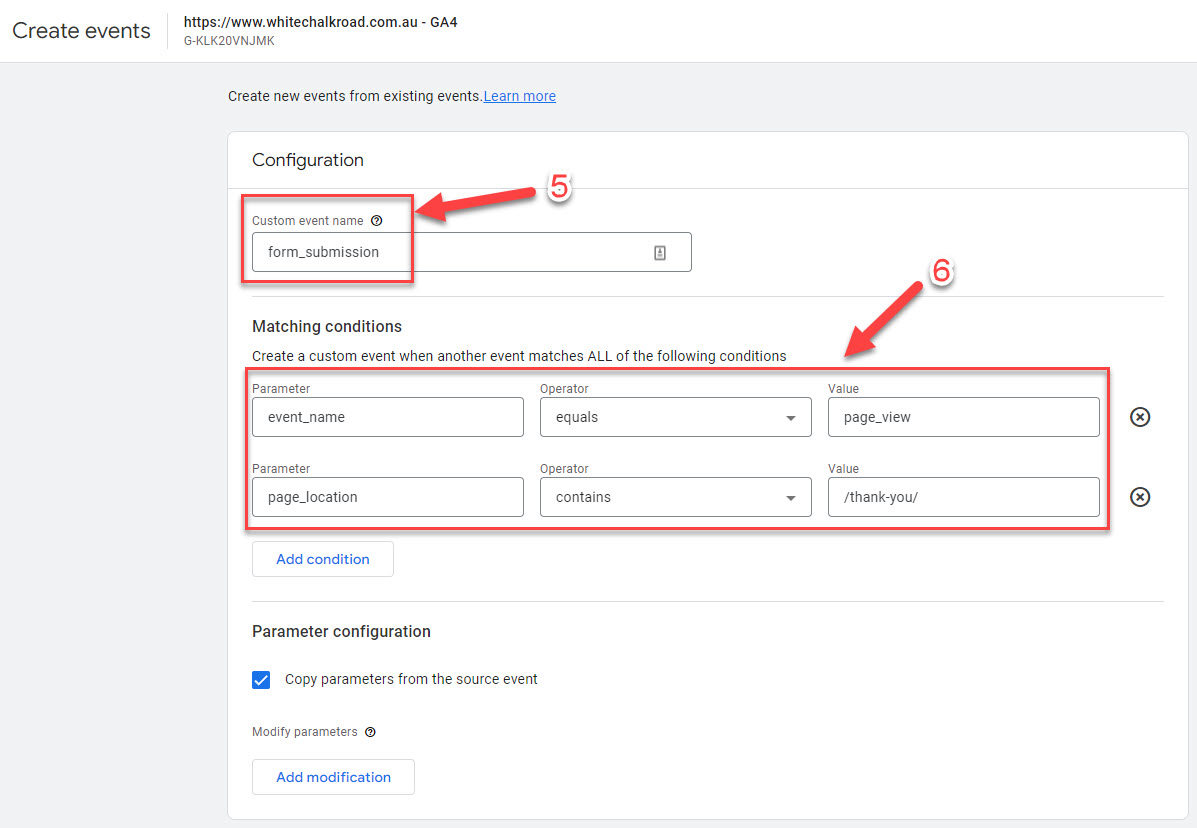
Important note: The matching condition of (Parameter: page_location Operator: contains Value: /thank-you/) will only work if users on your website are referred to a ‘Thank you’ page directly after submitting a form. The url string of this thank you page also needs to be /thank-you/. If the url string is /thank-you-for-contacting/ or something else, you will need to change the value of the matching condition (i.e. Parameter: page_location Operator: contains Value: /thank-you-for-contacting/).
4. Check that events and conversions are working using debug mode
Now that you have events and conversions set up, it’s time to check that they work.
This step is very simple:
- Log into Google Tag Manager
- Navigate to your ‘Workspace’
- Click ‘Preview’ (Image 9)
- Connect tag assistant to your site by entering your website URL and click ‘Connect’ (Image 10)
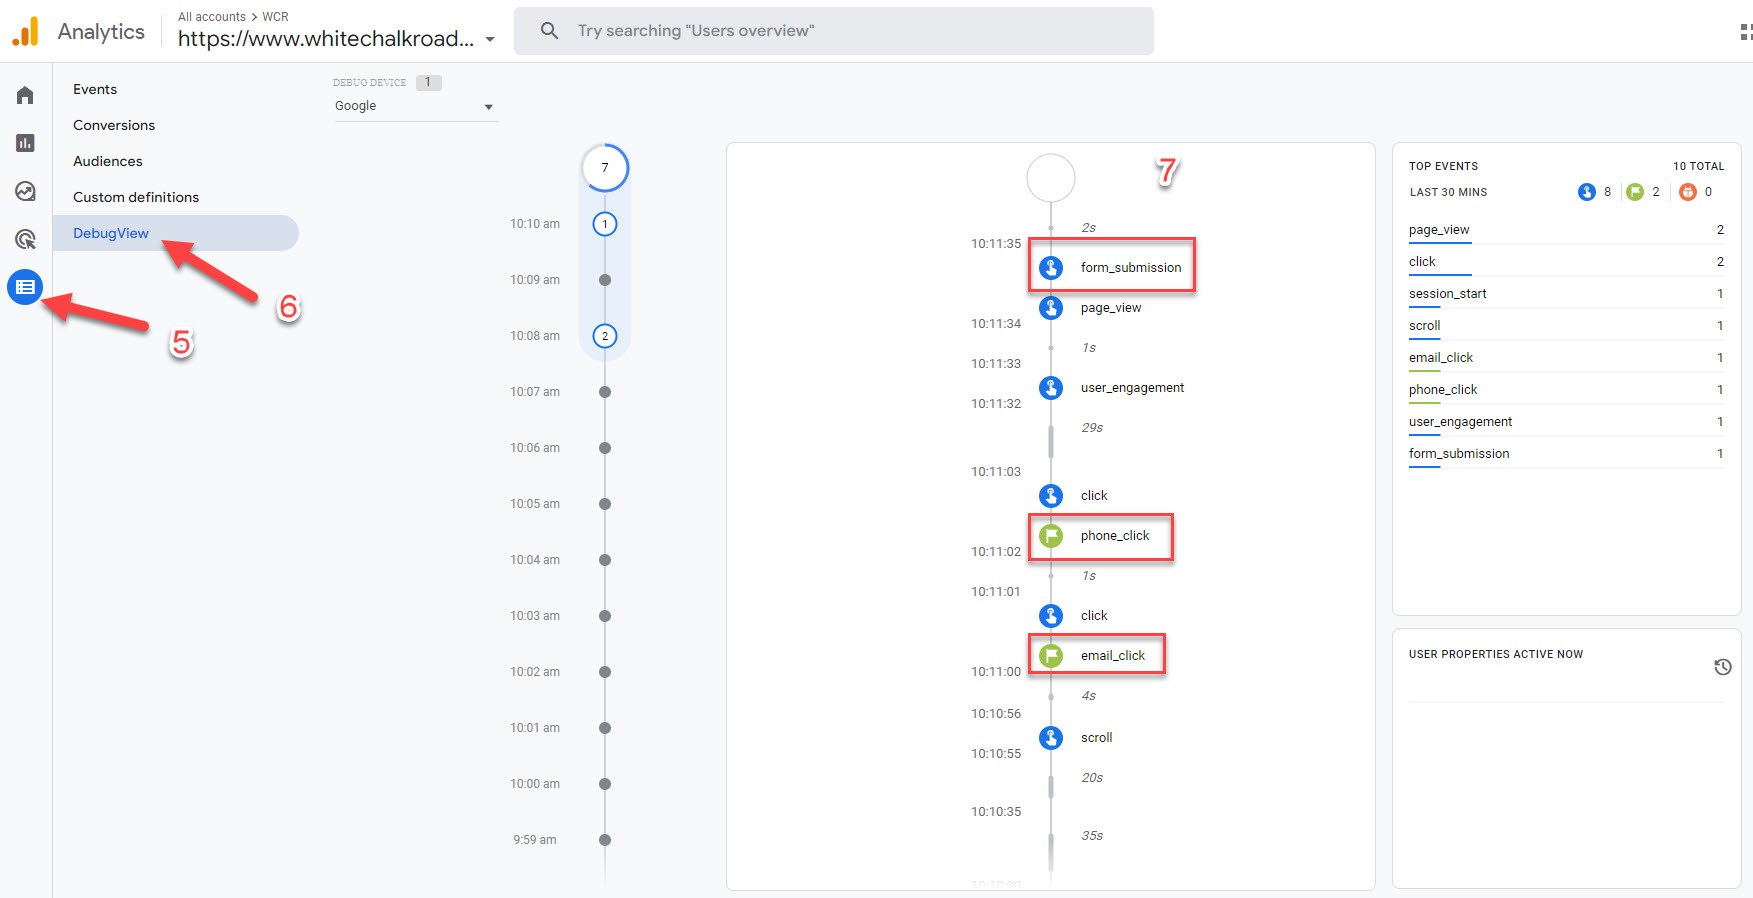
- Open GA4 and click ‘Configure’
- Click ‘DebugView’ (Image 11)
- Now go back to your website that is connected with tag assistant and complete all of the events you set up. In this case you would click on a phone number, click on an email address and complete a form submission.
- If set up correctly in GA4, these events will all appear in the debug timeline on GA4.
Image 9: Access preview mode in Google Tag Manager

Image 10: Connect preview mode in Google Tag Manager
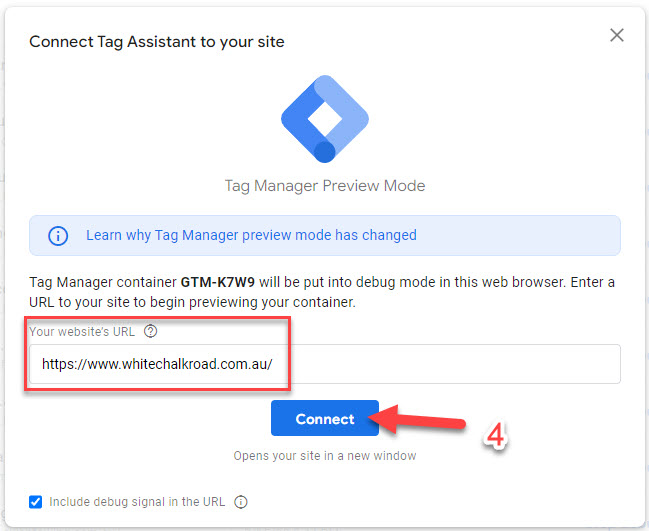
Image 11: DebugView in GA4
Tip: If you can’t see your events in DebugView then review your tags that you set up in Google Tag Manager. Check that the parameters are correct and that the event name is in the correct format (i.e. lower case with a ‘_’). Also check that the matching conditions you set up for your customised form_submission event are all correct.
Now you know how to set up events and conversions in GA4 using Google Tag Manager! Make sure you have these set up before the 30th June 2022, to ensure you will have year on year data in GA4 when Universal Analytics is completely replaced on July 1 2023.
Need assistance setting up your Google Analytics 4 or want to know more about how we can help you succeed online? Let’s chat!
Frequently asked questions about GA4
You can set up conversions in GA4 by either marking existing ‘Events’ as ‘Conversions’ or make custom conversions. GA4 when compared to Universal Analytics will track most user actions by default. However, to accurately track common conversions such as phone clicks, email clicks and form submissions, you may need to fire tags in a tool such as Google Tag Manager. Follow our easy guide to Google Analytics 4 for more information.
You can create and edit events in two ways. The first way is using code in Google Tag Manager or APIs such as gtag.js or Firebase. The second way is in configuration using Analytics through ‘configure’ and then ‘event options’. We go in-depth on how to track conversions in our Google Analytics 4 guide.
To set up the GA4 configuration, we recommend using Google Tag Manager to fire the code. By setting up and using Google Tag Manager, you can then add new tags and track more in-depth actions and events.


